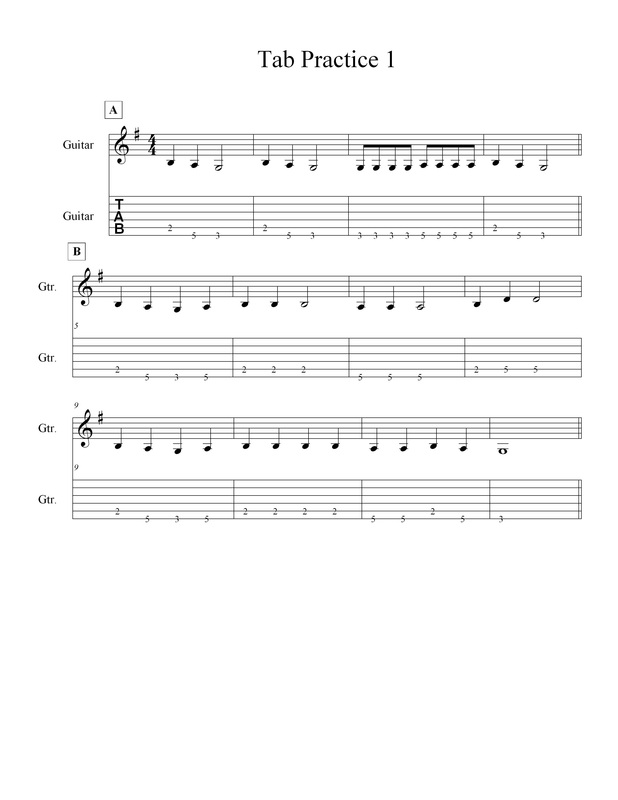
tabs
Tab Explanation (from ultimate-guitar.com)
Tabs tell you how a song is played in guitar. Reading tabs is easy, you won't have to go through this lesson twice.
Guitars usually have six strings (there are 7 string and 12 string guitars also, we'll ignore them now). The first thing you have to know is the name of the six strings. The top string is the thickest string, and it is called the 6th string or E-string because it plays E note at open fret (when you don't hold down any frets and just pick the string), assuming standard tuning. The next string is called 5th string or A string for similar reasons. The other string in order are 4th or D string, 3rd or G string, 2nd or B string and 1stor e-string (thinnest string). As the 1st and 6th string are both E notes, we distinguish the 1st string by writing it in a smaller case "e".
Now we are ready to move to tabs.
The first thing you will notice about tabs is that there are six lines. They represent the six strings of the guitar. They look like this:
e ------------------------
B ------------------------
G ------------------------
D ------------------------
A ------------------------
E ------------------------
I have written the string names (the note each string plays when you don't hold down any frets) on the left, this may not be given in all tabs. If it is not given, you have to assume that it is the same as I have written.
Note that the top string of your guitar (the 6th or E string) is written at the bottom of the tab, and the bottom string (1st of e string) is written at the top. Many beginners get confused at this, but this is the standard way to write tabs (don't ask me why).
Also note that in some cases the string names may be written differently. These are the cases when the song is not played with standard tuning. That means the open strings don't play the notes E, A, D, G, B, e but some other notes. As this lesson is for beginners, we will stick to standard tuning guitar tabs.
The next thing you notice on a tab is the numbers. The numbers represent frets. 1 means 1st fret,2 means second fret and so on. A 0 (zero) means open string. For example:
e --------2-----------------
B ------3---3---------------
G ----2-------2-------------
D --0-----------------------
A --------------------------
E --------------------------
The tab is read from left to right. So, this tab means, first you play D string at open fret, then G string at 2nd Fret, then B string and 3rd fret and so on. If you know your chord, then you would notice that this tab plays the notes of D-major chord.
Another example:
e --0--0--0--2--2--------------
B --0--0--2--3--3--------------
G --1--1--2--2--2--------------
D --2--2--2--0--0--------------
A --2--2--0--x--x--------------
E --0--0--x--x--x--------------
The difference between this tab and the first tab is that in this tab, multiple strings are hit at the same time, so this indicates strumming. At first you hold down and A and D string and 2nd fretand G string at 1st fret and play all 6 strings. If you know chords, then you would notice that this is E-major chord. According to the tab, E-major chord is strummed twice. The next chord is A-major which is strummed once and then D-major is strummed twice.
The x indicates that that string is not played. Meaning you don't hit that string with your strumming hand. It could also indicate a dead note. This means that you play that string with your strumming hand but it doesn't make a sound because you muted that string with your other hand. Holding a string lightly (rather than pressing it firmly down at the fret board) and hitting it creates a dead note. Whether or not a string in not played or a dead note can be confusing as they are both represented by x. Listening to the song will often give you a clue. For a beginner, assume that the x indicates that the string is not played.
Now for the special symbols used in tabs:
p = pull off
h = hammer on
\ = slide (downward)
b = string bend
/ = slide (upward)
~ = string vibrato
Let's explain these symbols with a tab:
e |-----------------------------------------------------------------------|
B |-----------------------------------------------------------------------|
G |---------------------------------9-11-11h12 12p11--9h11---|
D |-9-9h11--11p9--9-11/12--------------------------------------|
A |-----------------------------------------------------------------------|
E |-----------------------------------------------------------------------|
First, D string at 9th fret is played. Then we notice 9h11. This means you put your finger at 9th fret, pick the string than hammer the 11th fret. Hammering means you pick a string with your finger at one fret, then without picking that string again you use your fretting hand to hit another fret (in this case 11th fret) hard enough to create sound. Remember, you pick once but get 2 notes when hammering.
Next we see 11p9. This means pick the string at 11th fret then "pull-off" that finger while another finger is already placed at 9th fret. It's like pincing the string at 11th fret with the fretting hand while you have a finger placed at 9th fret. The effect is like reverse hammering. 2 notes are played with one picking of the strumming hand. Hammering and pull-offs are often done in a row like 9h11p9. It's playing the 9th fret, then hammering the 11th fret and then pulling-off to 9th fret again. All with just one pick of the strumming hand. Sound difficult? You will learn it if you practice. It's not that hard.
As we move along the tab, we notice 11/12. This means you hold down 11th fret and pick the string, then without releasing the pressure, you "slide" the finger to 12th fret. Again, you pick once but get two notes when sliding.
\ is just sliding in the other direction. So 5\3 means slide from 5th fret to 3rd fret, picking only once (at 5th fret).
~ means just vibrating the finger when you hold down a string at a fret. It gives a nice effect.
b means bending the string at a fret to give the sound of another fret. For a beginner I would suggest, avoid string bending for now, and don't try to play the tabs that has a lot of string bending.
Guitar ensemble Adjudication form
| guitar_ensemble.pdf |
| scuttle_buttin.pdf |
Open this file in your Listening Journal note in Notability. Listen to the song and answer the questions. When complete, either print it or email it to [email protected]
| jingle_writing.pdf |
| el_amor_brujo_aerial_boundaries.pdf |
| angry_anymore.pdf |
Open this file and open in Notability. Listen to "Scuttle Buttin'" by Stevie Ray Vaughan and answer the questions. Email the completed assignment to Mr. Follum at [email protected]
| action_writer_-_pg._17.pdf |
Music in the Civil Rights Movement
http://mlk-kpp01.stanford.edu/index.php/encyclopedia/encyclopedia/enc_songs_and_the_civil_rights_movement/
http://www.voanews.com/content/music-played-key-role-in-us-civil-rights-movement/1738614.html
http://mlk-kpp01.stanford.edu/index.php/encyclopedia/encyclopedia/enc_songs_and_the_civil_rights_movement/
http://www.voanews.com/content/music-played-key-role-in-us-civil-rights-movement/1738614.html
Discussion Report Card
We will use the following report card any time we have a major discussion in class. This will allow you to see what is expected of you during discussions and reflect on your contribution to the discussion. Fill it out in Notability.
We will use the following report card any time we have a major discussion in class. This will allow you to see what is expected of you during discussions and reflect on your contribution to the discussion. Fill it out in Notability.
| discussion_report_card.pdf |
Three Little Birds by Bob Marley
Create a note in Notability titled "Listening Journal". Download the following file and import it into that note. Listen to the song and answer the questions. This note will contain many listening journals, so DO NOT DELETE IT!
Create a note in Notability titled "Listening Journal". Download the following file and import it into that note. Listen to the song and answer the questions. This note will contain many listening journals, so DO NOT DELETE IT!
| three_little_birds.pdf |
Film Scoring
For this lesson, you will use this website, pgs. A-8 and A-9 in the Green Book, and My Big Campus.
First, download this file and open it in Notability:
For this lesson, you will use this website, pgs. A-8 and A-9 in the Green Book, and My Big Campus.
First, download this file and open it in Notability:
| film_scoring_statements.pdf |
Read the text on pgs. A-8 and A-9 of the Green Book. Write in evidence from the text to confirm or refute each statement on the PDF
Next read this article:
http://www.vulture.com/2013/10/michael-giacchino-how-to-score-a-movie.html
Write in evidence from the text to confirm or refute the statement on the PDF
Finally, log onto My Big Campus. Go to the group 8th Grade General Music, Quarter 2. Go to the Resources tab and watch the video titled Composer Mark Isham's Tips for Creating a Movie Soundtrack. Write in evidence from the interview to confirm or refute each statement on the PDF
Once all your evidence is gathered, email it to Mr. Follum. Then you can write your own soundtrack for the Dogs of War clip on My Big Campus. Take into account what you learned from the articles and interview while creating your soundtrack. The soundtrack will be due at the end of class tomorrow.

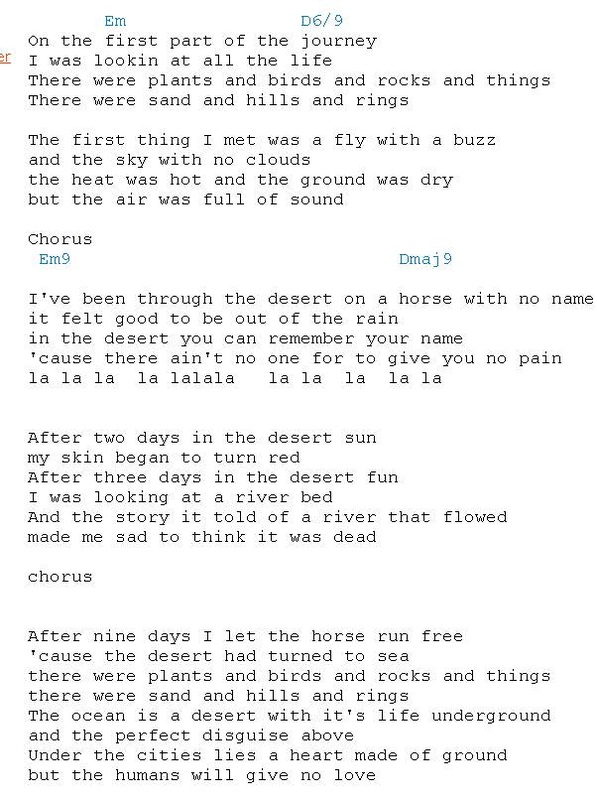
Horse With No Name
Note Reading Exercise
Download the following file and import it into Notability. Write down the words spelled by the notes, and then send the completed document to Mr. Follum at [email protected]
Download the following file and import it into Notability. Write down the words spelled by the notes, and then send the completed document to Mr. Follum at [email protected]
| note_reading_exercise.pdf |
Witness by Bo Bice
| witness.pdf |
Renaissance Instrumental Music
Read the following excerpts from articles:
Instrumental Music of the Renaissance
Instrumental music throughout the Renaissance was closely associated with vocal music. Only at the Sistine Chapel in Rome, and at a few other chapels with choirs of competent singers, was polyphonic church music consistently sung unaccompanied. Elsewhere the organ, lute, viols, or other instruments accompanied, doubled, or substituted for voices, and organists developed a huge repertory of music for use in church services, including preludes, interludes, and arrangements of liturgical melodies. In secular music, the lute remained popular both for solos and in ensembles; clavier instruments were coming into wider use, and hundreds of pieces were written for chamber music ensembles.One sign of the 16th century's growing regard for instrumental music was the publication of books which describe instruments or give instructions for playing them. The first such publication was in 1511. Others followed in increasing numbers throughout the century. It is significant to note that they were written in the vernacular, instead of Latin, and were addressed to practical musicians and not to theorists.16th-century music can be divided into four basic categories: compositions derived from vocal models, dances, improvisatory pieces, and variations. These classifications aren't perfect, for a piece may easily belong to more than one category. For example, a dance piece could be written in a variation form.
The Renaissance Era - Instrumental
Even though the instrumental music of the Renaissance period did not equal the vocal music, in terms of quality and quantity, it still played an integral part of the era. Instrumental music gained in popularity and developeda musical form that was distinct from vocal music. During the Renaissance era, instrumental music was written according to specific rules.
- 1. Improvisation was very important in performance and for melodic ornamentation.
2. Transcriptions of vocal music for instrumental performance were numerous.
3. Instruments were freely employed in the performance of vocal music.
4. Some instrumental forms were borrowed from vocal forms, while others were instrumentally invented.
- 1. Melodic range was wider than vocal limitations.
2. There was extensive ornamentation including coloration, embellishment, and figuration.
3. There was a much freer treatment of dissonance.
4. In lute and keyboard music contrapuntal parts were freely added or dropped without indicating rests.
5. There were exceedingly long and rapid scale passages.
6. There were numerous wide skips.
Website Project
Create a website detailing the important facts about the instruments in the document to follow. Use http://www.wix.com/ to create the website (I am 99% sure it will work)
Be creative and have fun; don't make a lame website. Use lots of pictures and find weird and interesting details. Also include specific information; no generalizations. DO NOT COPY AND PASTE; all the words need to be your words. If your research leads you to something you don't understand, research it until you do understand.
When you feel you have made a detailed and interesting website, email Mr. Follum the link at [email protected]
This will be due no later than next Monday, October 21.
| 8th_grade_c-4_medieval_and_renaissance_instruments.pdf |
Medieval Instrumental Music
Read the article in the Green Book on pg. C-6. Then read this article: http://library.thinkquest.org/15413/history/history-med-inst.htm
Now listen to two pieces of Medieval instrumental music. Download the listening guide and fill it out in Notability.
Read the article in the Green Book on pg. C-6. Then read this article: http://library.thinkquest.org/15413/history/history-med-inst.htm
Now listen to two pieces of Medieval instrumental music. Download the listening guide and fill it out in Notability.
| 8th_grade_lesson_c-6_medieval_instruments.pdf |
Play one of these rhythms on a percussion instrument to accompany La tierche extampie real
| lesson_c-6_rhythms.pdf |
Soundtrack Assignment
Jaxon and Bryce, you still owe me this one...
Jaxon and Bryce, you still owe me this one...
| dogs_of_war.mp4 |
Open this file and open in Notability. Use it to compare and contrast a piece of Medieval and a piece of Renaissance music. Then write a complete paragraph which explains your findings. You will be graded using the same rubric as the last assignment; it is further down this page. Please look at it so that you know what I expect.
| comparison_matrix.pdf |
Medieval Music Articles
Open this document in Notability. Use the text function to write for the prompt. Then email the finished document to Mr. Follum at [email protected]
| medieval_music_writing_prompt.pdf |
Here is the rubric that Mr. Follum will use to score your writing (he stole it from Delaware; don't tell anybody).
| 8th_grade_writing_rubric.pdf |

